Table of Contents
- Prepare
- Add minimal HTML structure
- Initialize Plupload
- Create upload handler
- Activate the File Queue
- Error handling
- Activate Start Upload button
- Full example
Prepare
The latest build is always available from download section on the Plupload site.
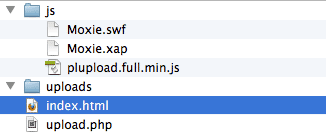
For the sake of simplicity let's copy the whole js/ folder to the same place where our sample html will reside.
Let's start by including js/plupload.full.min.js. Core API doesn't depend on jQuery or any other framework, so it can be used as it is.
Add minimal HTML structure
Now we need a couple of DOM elements to turn into the main functional components of a typical file uploader - browse button, upload button and the file queue:
<ul id="filelist"></ul>
<br />

<div id="container">
    <a id="browse" href="javascript:;">[Browse...]</a>
    <a id="start-upload" href="javascript:;">[Start Upload]</a>
</div>
Let's bring these to life now.
Initialize Plupload
First, we instantiate Plupload uploader:
<script type="text/javascript">
var uploader = new plupload.Uploader({
  browse_button: 'browse', // this can be an id of a DOM element or the DOM element itself
  url: 'upload.php'
});

uploader.init();
</script>
Notice that we explicitly call init() method on the uploader object to actually initialize it. There's is a reason for that, but let's leave the explanation for later. For now simply remember that we call it, before we bind any event listeners to the uploader.
Typically your configuration will be larger, but for now this is all you need - browse button and url of a server-side handler, that will accept the files, do some security checks on them and finally move them to a destination folder.
Create upload handler
Let's do a couple of things right away - create destination folder - uploads/, where we will put the files (it should have write permissions) and the upload handler - upload.php, which will move them there.
You might not be using PHP of course, but the main logic is very simple and easily portable to any other server-side language.
<?php

if (empty($*FILES) || $*FILES["file"]["error"]) {
  die('{"OK": 0}');
}

$fileName = $*FILES["file"]["name"];
move_uploaded_file($*FILES["file"]["tmp_name"], "uploads/$fileName");

die('{"OK": 1}');
?>
For simplicity we only move the file, without any checks (in real life this is wrong of course). Also it is better to output some response from the server (simple JSON for example), this way you will make sure that Plupload will detect the end of a request, whatever the runtime.
Activate the File Queue
This step is completely up to you. In our example we simply add selected files to the improvised queue and will display upload progress along each one of them. To achieve this, let's hook onto FilesAdded and UploadProgress events:
uploader.bind('FilesAdded', function(up, files) {
  var html = '';
  plupload.each(files, function(file) {
    html += '<li id="' + file.id + '">' + file.name + ' (' + plupload.formatSize(file.size) + ') <b></b></li>';
  });
  document.getElementById('filelist').innerHTML += html;
});
For each file we generate a line in the list. Notice empty <b></b> tags, this is were we will put the progress percentage.
uploader.bind('UploadProgress', function(up, file) {
  document.getElementById(file.id).getElementsByTagName('b')[0].innerHTML = '<span>' + file.percent + "%</span>";
});
That's it. There are plenty of other events fired by the uploader, you can find the full reference in the API pages.
Error handling
Another thing that you absolutely need to implement is error handling. It may seem boring and completely unnecessary, when everything just works, but it might help you save hours of beating your head against the wall, if suddenly something somewhere goes wrong.
So, lets add just one more chunk of html to our structure:
<br />
<pre id="console"></pre>
And another event listener:
uploader.bind('Error', function(up, err) {
  document.getElementById('console').innerHTML += "\nError #" + err.code + ": " + err.message;
});
What this does is that it simply logs all errors to the improvised console (real-world error handler might do something more useful).
Activate Start Upload button
Finally we initiate the upload when Start Upload is clicked:
document.getElementById('start-upload').onclick = function() {
  uploader.start();
};
Full example
<!DOCTYPE html>
<html xmlns="http://www.w3.org/1999/xhtml" dir="ltr">
<head>
<meta http-equiv="content-type" content="text/html; charset=UTF-8"/>

<title>Plupload - Getting Started</title>

<script type="text/javascript" src="js/plupload.full.min.js"></script>

</head>
<body>

<ul id="filelist"></ul>
<br />

<div id="container">
    <a id="browse" href="javascript:;">[Browse...]</a>
    <a id="start-upload" href="javascript:;">[Start Upload]</a>
</div>

<br />
<pre id="console"></pre>

<script type="text/javascript">

var uploader = new plupload.Uploader({
  browse_button: 'browse', // this can be an id of a DOM element or the DOM element itself
  url: 'upload.php'
});

uploader.init();

uploader.bind('FilesAdded', function(up, files) {
  var html = '';
  plupload.each(files, function(file) {
    html += '<li id="' + file.id + '">' + file.name + ' (' + plupload.formatSize(file.size) + ') <b></b></li>';
  });
  document.getElementById('filelist').innerHTML += html;
});

uploader.bind('UploadProgress', function(up, file) {
  document.getElementById(file.id).getElementsByTagName('b')[0].innerHTML = '<span>' + file.percent + "%</span>";
});

uploader.bind('Error', function(up, err) {
  document.getElementById('console').innerHTML += "\nError #" + err.code + ": " + err.message;
});

document.getElementById('start-upload').onclick = function() {
  uploader.start();
};

</script>
</body>
</html>
Here's the Gist.
Also be sure to check our custom.html, that we bundle with the package, for alternative syntax and more complete example.
